
February 1, 2024
Google Tag Manager event tracking – The Guide
Updated: February 1st, 2024
Before we continue, I want to give a quick disclaimer. Even though the main focus of this article is on Google Tag Manager event tracking, Google Analytics 4 (GA4) will also play a very important role.
GA4 presents a new way to look at data, mainly how we visualize events. You will have noticed this if you’ve been using it for a while now. The flexible data model offers granularity in understanding your data, where every user activity is considered an event.
But the out-of-the-box GA4 configurations are just the tip of the iceberg. You can extract more data if you know how to do it. You must learn to use Google Tag Manager to unlock GA4’s full capabilities. But before we dive into this, – let’s set the foundations.
This guide will be a complete roadmap for getting started with GA4 and Google Tag Manager event tracking.
- I will begin with the limitations of the out-of-the-box GA4 configuration and why it is not enough when you dive deeper into GA4
- Then we will proceed to the fundamentals of event tracking with GTM and GA4
- After this, I will walk you through a few examples of setting up Google Tag Manager event tracking on a website
Here’s what you will learn in this article
- Section 1: Introduction to Google Analytics 4 Events
- Section 2: How to Set Up Event Tracking in Google Tag Manager?
- Section 3: Tracking custom events with Google Tag Manager
- Final Words
Section 1: Introduction to Google Analytics 4 Events
Event tracking in GA4 is an entirely new beast to tame. But once you understand the basics, it becomes easier than it looks. In my opinion, every marketer should ensure they have a working knowledge of this.
I will start by listing the case for GA4’s event tracking capabilities. But, if you’re unsure about the difference between Google Tag Manager and Google Analytics, you should read this guide first.
#1.1. What does Google Analytics 4 bring to the table?
Note: if you are already familiar with the basics of GA4, then feel free to skip to the next chapter of this blog post.
I’ll start with a brief introduction to Google Analytics 4. It will remain within the scope of this article. But to understand GA4 completely, you should read this article.
We mentioned above that the data model in Google Analytics 4 is flexible. It places fewer restrictions and mandatory parameters to be entered by the user. People who have used Universal Analytics (GA3) know that for every event tracked, 4 parameters could be sent:
- Event Category (required)
- Event Action (required)
- Event Label (optional)
- Event Value (optional)
But with GA4, you have to enter the event name (as long as it doesn’t clash with the reserved event names), and you’re good to go. Don’t want to track any parameters? That’s possible. What about custom parameters that better define your event? You’re free to do so.
In fact, Google Analytics 4 can track a bunch of events automatically (unlike GA3).
But that may not give enough insight into the user’s behavior on your website. For example, you track outbound clicks. Does that tell you a lot about the user’s engagement on the website? Not really. For this reason, most businesses would benefit from tracking custom events. Managing this through Google Tag Manager is the most flexible way.
#1.2. Why is it useful to track events?
Event tracking is the way to understand the actions taken during your website visitor’s journey. The most common examples include clicks, downloads, form submissions, purchases, scroll depth, etc. We can then use this information to develop hypotheses about user behavior.
GA4 splits all events into 4 categories:
- Automatically collected events
- Enhanced Measurement events
- Recommended events
- Custom events
Speaking of automatically tracked events, some of the examples are:
- scroll
- session_start
- user_engagement
- file_download
- video_progress
- click
- view_search_results
These events can help you understand some aspects of user behavior. But is that enough?
Can you answer which products on your website are most popular among social media visitors? Can you answer if visitors see an important section of your website before clicking the call-to-action button? Probably not.
That’s where custom event tracking is necessary, and Google Tag Manager can help you with that. I recommend it because GTM offers more flexibility in configuring and modifying custom events.
Take the screenshot below, for example. While GA4 tracks many events by default, I added custom events to help define and understand the user journey. These are view_item_list, view_item, and view_promotion. These events could help me understand my users better and how they interact with my website.
And when Google Analytics receives those events from Google Tag Manager, you’ll have a report like this:

As I said, event tracking is a formidable beast. But this article will show you the way – from deciding what events to track and how they should be named to setting it up through Google Tag Manager and testing if they work as required.

Section 2: How to Set Up Event Tracking in Google Tag Manager?
I’ve split Google Tag Manager event tracking into two sections:
- Section 2 is about tracking events with the standard GTM functionality. This should be enough for beginners. But if you plan to improve your skills, I’ll highlight custom auto-event listeners you can implement yourself.
- Section 3 is about cooperating with a developer and asking them to push the event data to the Data Layer
#2.1. The Plan
Every time you want to track events with built-in GTM functionality, these are the steps you must complete:
- Have at least one trigger (of a particular type) enabled on a page
- Enable related variables
- Update the trigger (to make it precise)
- Create a tag (in our case, it’s GA4) and assign the trigger to that tag
#2.2. GTM Event Tracking Example – Menu Link Clicks
Let’s use the plan above as a case for tracking menu link clicks.
Regarding event tracking in Google Tag Manager, the first step (at least in my opinion) is to pick the right trigger. Since we want to measure clicks of menu links, how about we create a link-related trigger in GTM?
#2.2.1. Generic link click trigger
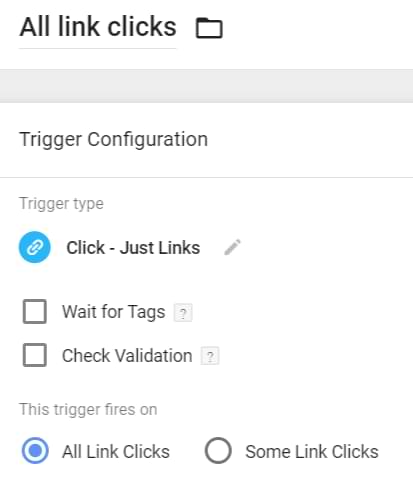
In Google Tag Manager, go to Triggers > Trigger Configuration > New > Just Links. Name the trigger All Link Clicks (or anything else) and leave all other settings just as they are.
Save it and refresh the preview and debug mode. Go to the page where you wish to track links with Google Tag Manager. Click any link on a page.
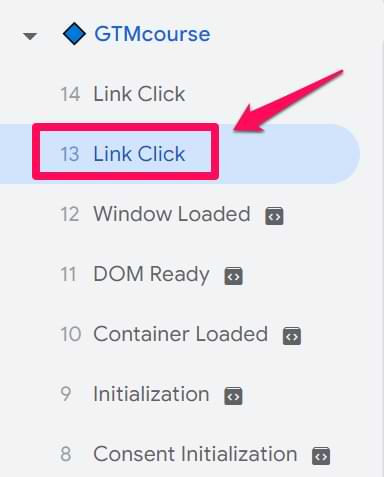
Once you have clicked the link, go back to the Preview and Debug tab. You’ll see a new event, Link Click. That’s what our link click auto-event listener did. It directed Google Tag Manager to look for link clicks on a page.
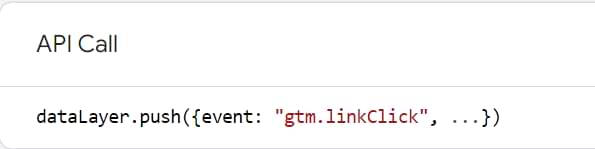
Once it spotted one, it pushed a gtm.linkClick event to the Data Layer, which became visible in the debug console as Link Click.
If you don’t see this event, try refreshing the Preview and Debug mode and clicking the menu link again. Surprisingly, you may not see all the data you wish to see, so keep reading to find out why.

#2.2.2. Enable built-in click Variables
Configuring triggers is necessary, but you’ll want to get more out of your events as you get better. You should fine-tune when the event triggers should fire.
Instead of activating a trigger on “All link clicks”, we can make it more precise and fire only when certain conditions are met, for example, “when a link contains a particular class or ID.”
Variables can help us achieve this.
They store little pieces of information that are used both in Tags and Triggers (and, in fact, in other variables too). For example, Click ID. You can use it as a trigger condition (e.g., fire the Google Analytics Event code when the ID of the clicked button equals “main-cta-button”).
Thanks to the GTM Preview and Debug mode, we can see what variables are available at every event.
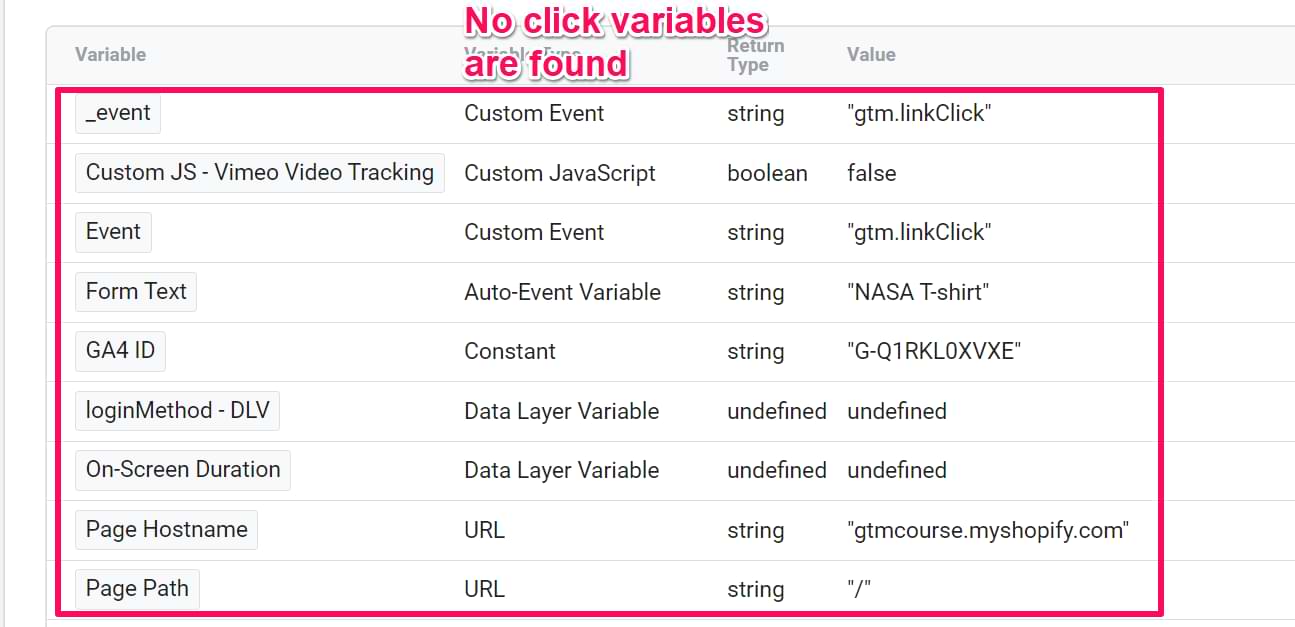
Click the Link Click event on the left side of the preview mode and go to the Variables tab. Keep looking for anything related to clicks. If you’re working on a new container, you most likely won’t find anything.
Don’t worry. You should expect this. Now go to the Data Layer tab (while the Link Click event is still selected). You’ll see link-click-related parameters, like gtm.elementId or gtm.elementClasses.

Even though Google Tag Manager tracks the click data, it is not available in the Variables tab of the Preview & Debug console. Why? Because built-in click variables are not enabled in the GTM interface by default.
What does that mean? Even if the data has loaded correctly on the website, you cannot use variables in your triggers unless there are variables to record.
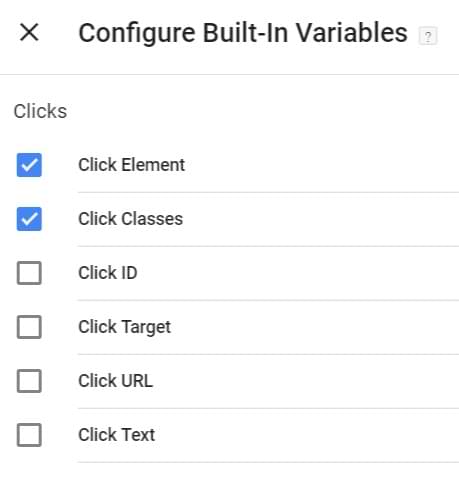
To activate them, go to Variables, and click Configure in the Built-in Variables section.
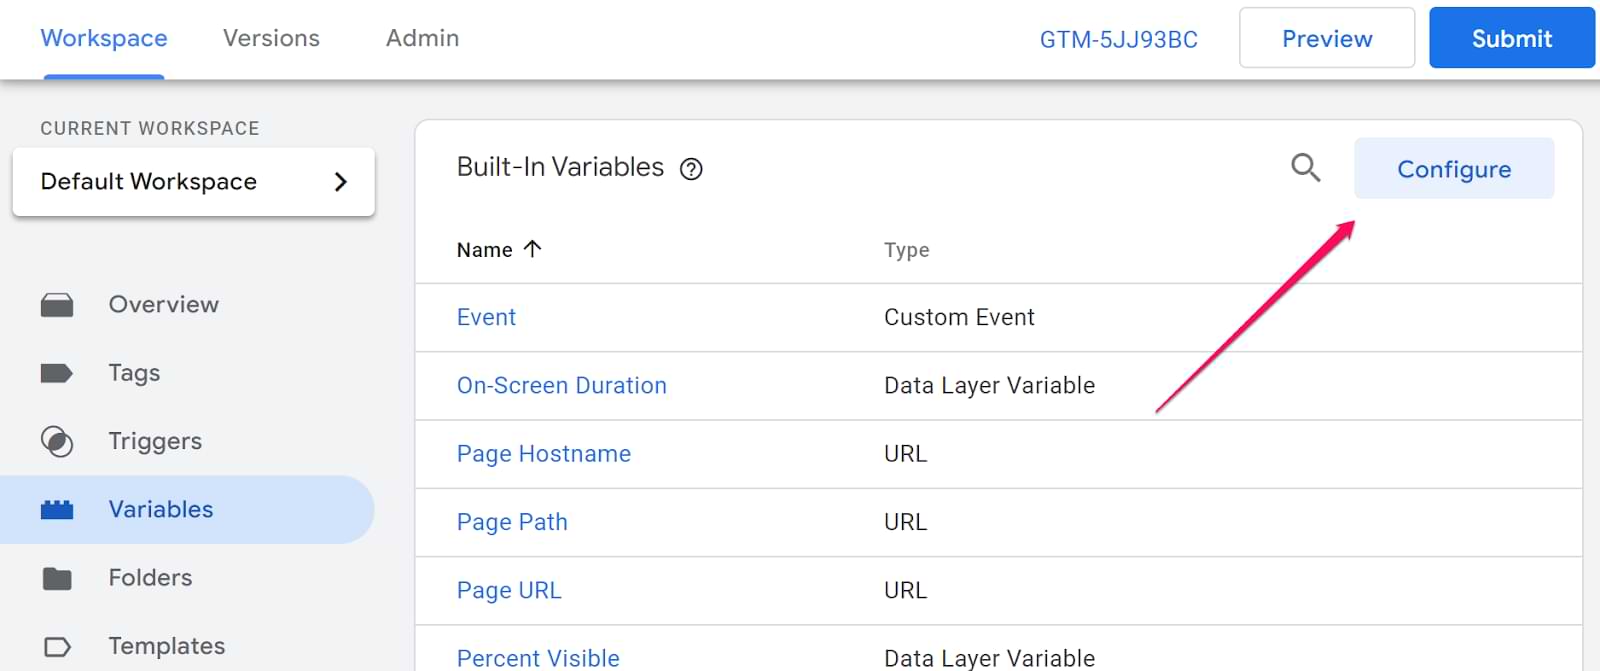
A panel will appear on the right side. Scroll down until you find click variables and enable them ALL one by one.
After that, refresh the Preview and Debug mode. Enter the URL to the page to which the trigger should fire. Click on a link once again.
A Link Click event will appear in the event list of the Preview & Debug tab. Let’s take a look at what it has captured. Click the event, then go to the Variables tab and look for click-related variables. They should have some values in them now.
#2.2.3. Update the trigger
Now, it’s time to make our trigger conditions precise. This case is for tracking menu link clicks. So we will create a trigger to fire only in such situations.
Now, you might be thinking – Which variable in Google Tag Manager should we use as a part of the triggering condition?
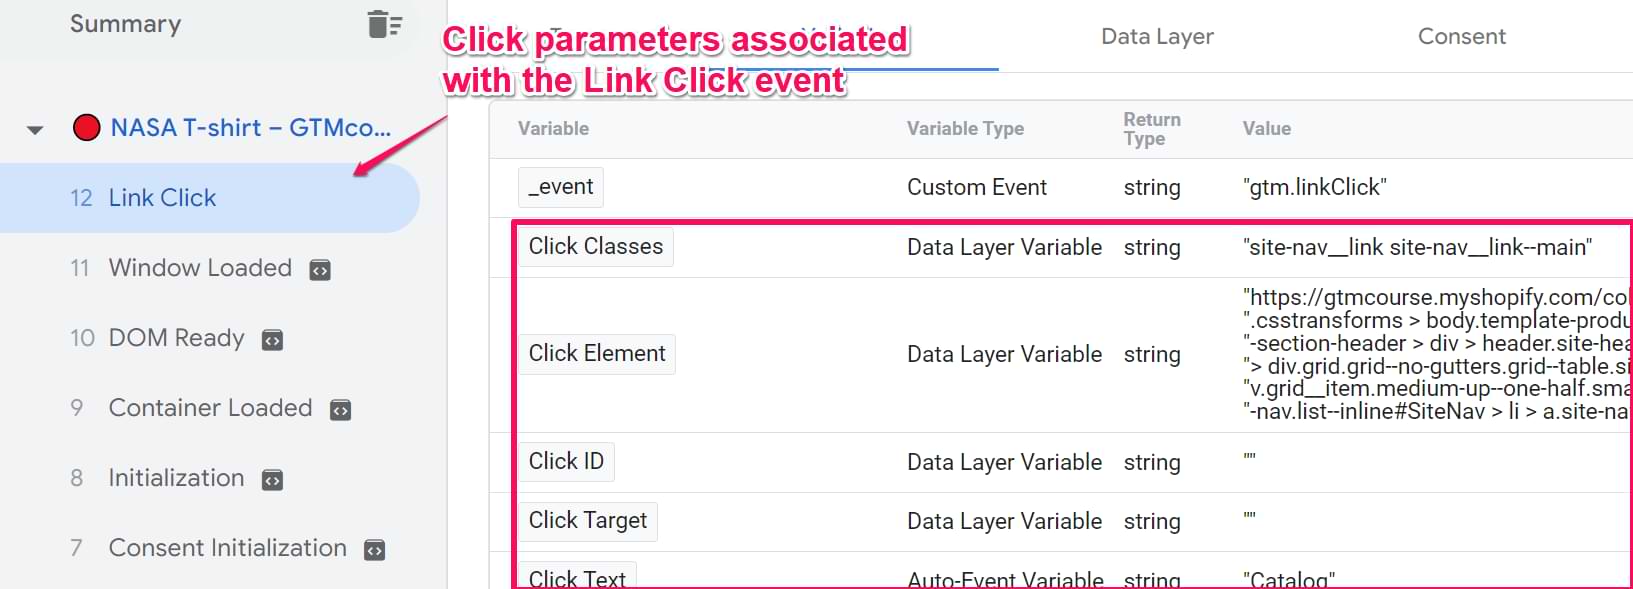
Let’s go back to the Preview and Debug console. To determine the trigger condition, click any menu link on a page. Then click the Link Click event in the event stream and look at the Variables tab. Now, this is dependent on your judgment. Which variable has a unique value to distinguish a menu link from all the others?

You will notice the Click Classes variable contains a value of “site-nav__link site-nav__link–main”.
Sidenote: every website is coded in a different way. In my case, it was “site_nav__link…”. In your case, it might be something different. Or you might not even have any value at all there. Then you should ask a developer to add an ID or a class to an element.
Try clicking various unrelated buttons on a website, and you will see the value of Click Classes changes. But among the menu link, this value remains constant.
So the menu click trigger should fire when the click classes contains a value of “site-nav__link site-nav__link–main”
Additionally, we need to exclude link clicks that are:
- email links (e.g., [email protected])
- phone numbers (e.g., +123456789)
- links that do not redirect anywhere (they usually just display a popup or something like that). In GA reports, they might appear as javascript:void(0).
We can avoid this if we narrow down our trigger to track only those links with click classes as mentioned above.
Go to Google Tag Manager > Triggers and open the previously created “All link clicks” trigger.
We’ll edit it to track only link clicks where Click Classes contains “site-nav__link site-nav__link–main” and change its settings. You can take a look at the screenshot below for reference:

#2.2.4. Create a tag
Finally, let’s send the menu link clicks as events to GA4.
First, you need to have a Google Tag (a.k.a. Google Config tag) installed in Google Tag Manager. If you haven’t done that yet, read this article first).
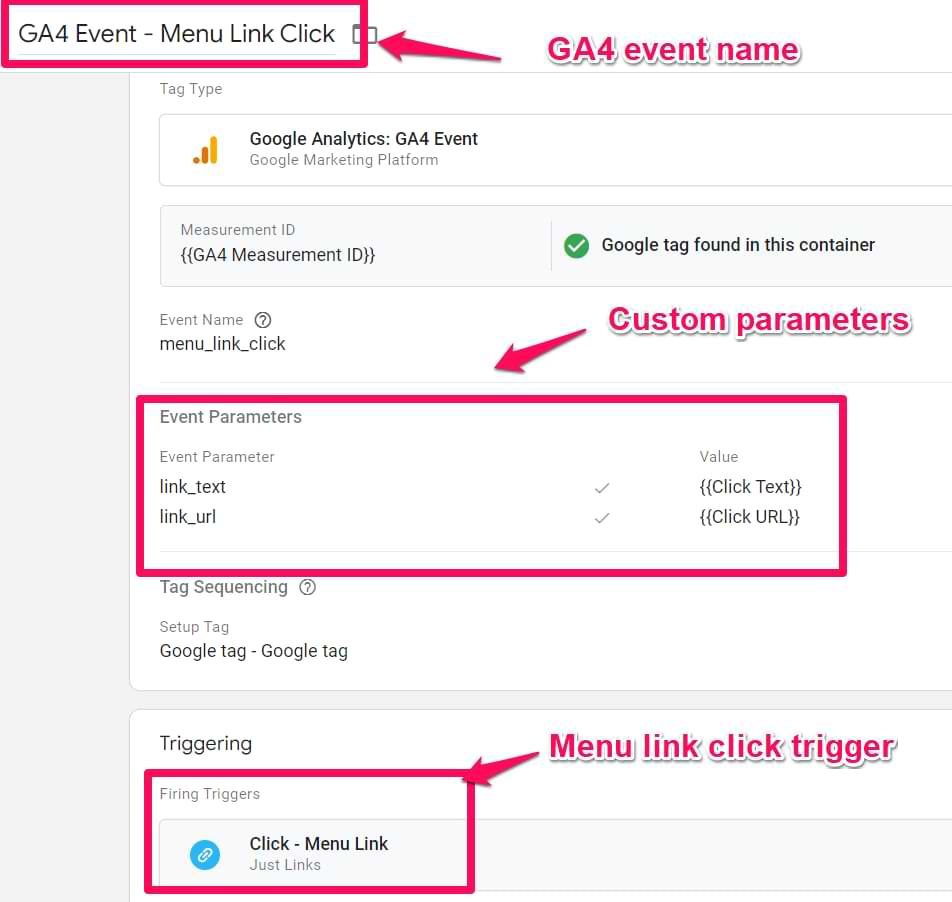
Then, go to Tags (in your GTM interface) > Tag Configuration > Google Analytics > Google Analytics: GA4 Event.
Enter your GA4 measurement ID (it might be added as a variable) and then an event name (in my case, menu_link_click). If there are any custom parameters, you can define them too.
In this case, I added link_text and link_url because Google Analytics will be able to recognize these parameters in reports and make them available in explorations.
Once you’ve configured the settings and the parameters you want to capture, add the trigger. The event will be sent to GA4 when the trigger fires on a menu link click.
#2.2.5. Don’t forget to test
Enable (or refresh) the Preview and Debug mode. Here are the scenarios you should test:
- Click an email link if you have one (it’s one of those links added to your website, e.g., on the “Contacts” page). The GA4 Event tag should not fire.
- Click an external (outbound) link. The GA4 Tag must not fire.
- Click a Menu link (e.g., the one that opens a “Contact us” page). The tag should fire in this case.
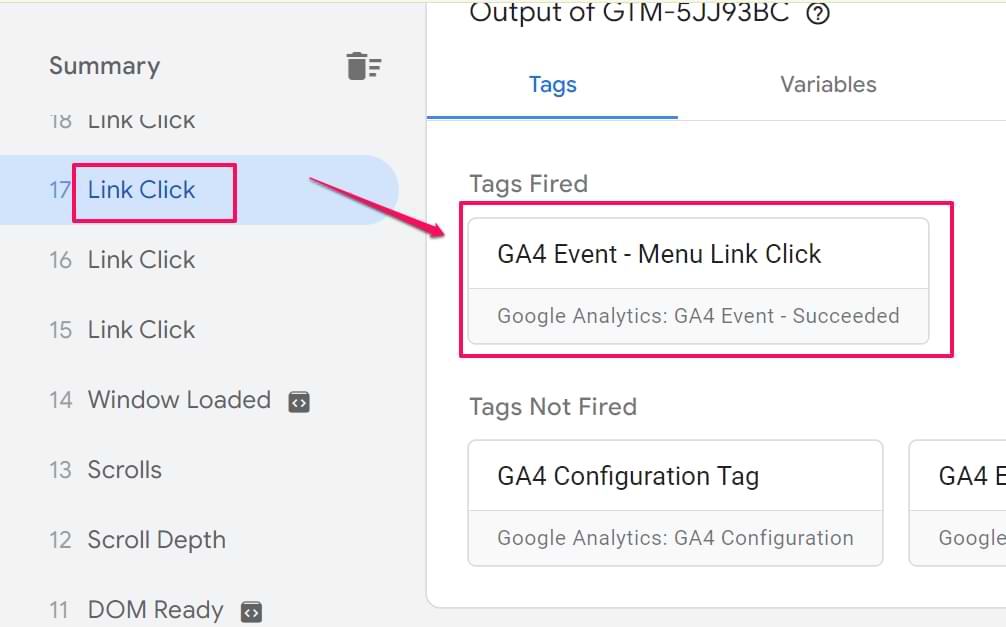
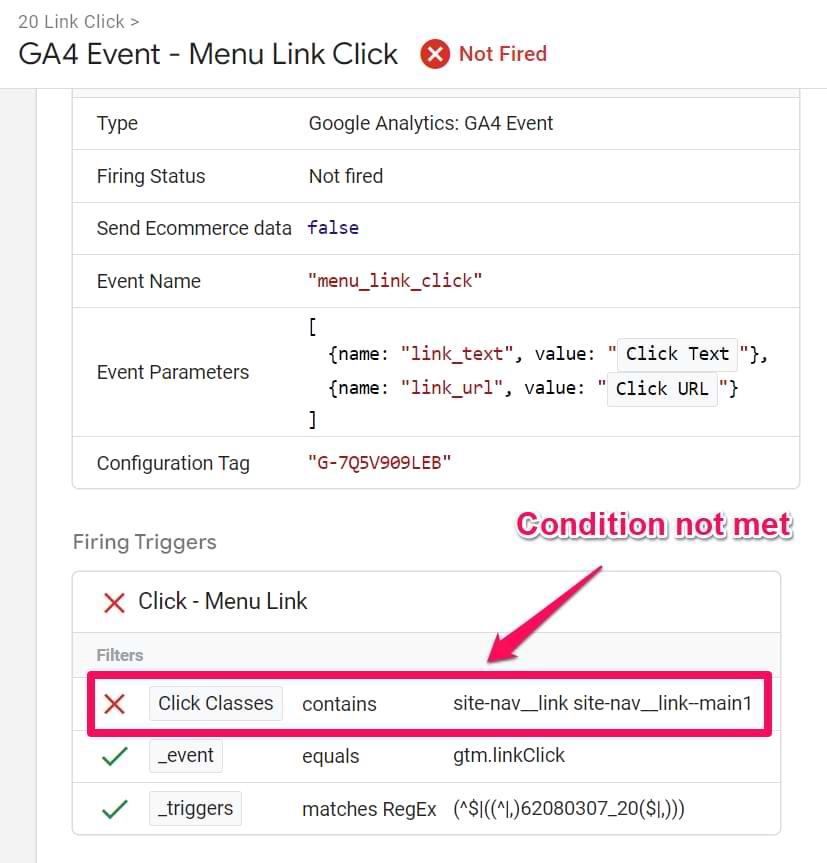
If the tag did not fire, check why in the Preview & Debug mode. Scroll down to the Firing triggers section and check what conditions were not met (marked with a red X).
Once you confirm that Google Tag Manager has captured the event, you should take a look at GA4 and see if it has been recorded there. You can check this by accessing the DebugView report. Head over to your Google Analytics 4 account > Admin > Debugview.

If, for some reason, you don’t see the data in the Debug View, read this guide.
Open the DebugView dashboard and keep it ready to check if the event is received.
Open your Google Tag Manager in another tab and enter the Preview & Debug mode. Let’s fire the Menu Link Click once again.
Click on any menu option, and make sure it has fired in Google Tag Manager. Then head back to the GA4 DebugView dashboard. Wait for a few seconds, then you will see an event recorded like this.
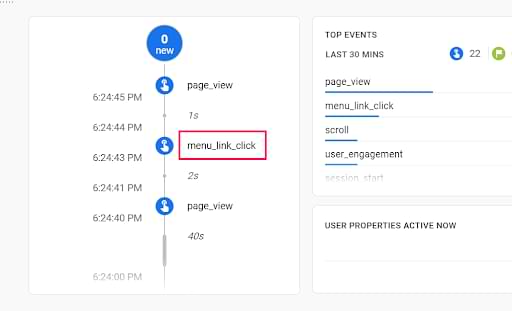
Since we are passing it to Google Analytics 4 as an event, it uses the blue icon. But if we configure it to be a conversion, then it would use the green icon. Just a visual way to quickly distinguish between events and conversions.
#2.3. More GTM event tracking examples? Yes, please!
And there are many more examples of how you can track events with Google Tag Manager. I don’t want to turn this blog post into a 20,000-word behemoth, so I’ll just give you some links. You can decide which ones you need:
- Video tracking
- Button click tracking
- Form submission tracking
- Combine multiple events, and if all of them occur on a page — only then send an event to GA
And these are just a few examples of what is possible. I’ve created a guide – 99 things you can do with Google Tag Manager (and this goes even beyond the event tracking).

Section 3: Tracking custom events with Google Tag Manager
Sooner or later, you will want to explore the full range of Google Tag Manager. When this situation arises, the built-in variables and triggers might not be helpful, and no ready-made solutions might not be available (like GTM recipes).
Then you will need to become familiar with a thing called Data Layer. By default, Google Tag Manager publishes one when it activates on your website.
But for custom events and data to work, you should cooperate with a developer. This case arises more frequently in eCommerce, where custom events help you uncover valuable insights that could positively impact your business.
Event information can be pushed to the Data Layer once that particular interaction occurs. For example, Google Tag Manager captures the event information and then passes it on to GA4.
#3.1. Prepare a Data Layer Event Code
For example, let’s say we want to track successful registrations on a website. You could give the following code to a developer:
<script>
window.dataLayer = window.dataLayer || [];
window.dataLayer.push({
'event': 'registrationComplete'
});
</script>
Once a developer successfully implements this code, you will start seeing it in the GTM Preview and Debug console.
If you want to get some additional data, ask the developer to include it in the dataLayer.push() code:
<script>
window.dataLayer = window.dataLayer || [];
window.dataLayer.push({
'event': 'registrationComplete'
'plan': 'premium' // the name of a pricing plan
});
</script>
#3.2. Make it clear to the developer when the custom code should fire
Another critical step is to explain to the developer WHEN you want the dataLayer.push() code to fire. If you’re looking to track form submissions, the event should fire after a visitor submits the form. For eCommerce purchases, the event should fire immediately after a successful purchase. You get the idea.
#3.3. Test the event
After a developer says that the task is complete, enable GTM Preview and Debug mode to test it.
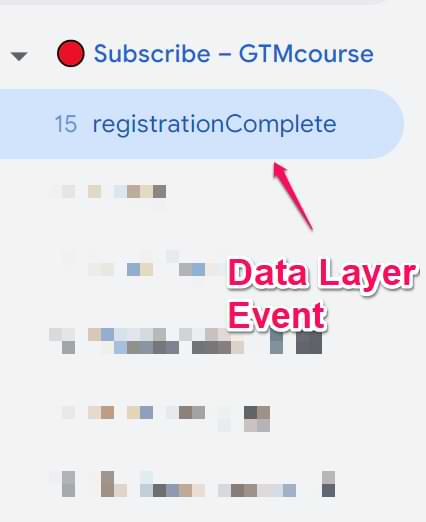
Complete that specific interaction (e.g., submit the form) while looking for the Data Layer event in Preview and Debug mode’s event stream. It will be visible on the left sidebar of the preview mode.
Similar to the Link Click we tracked above, the registrationComplete event should appear in the event stream.
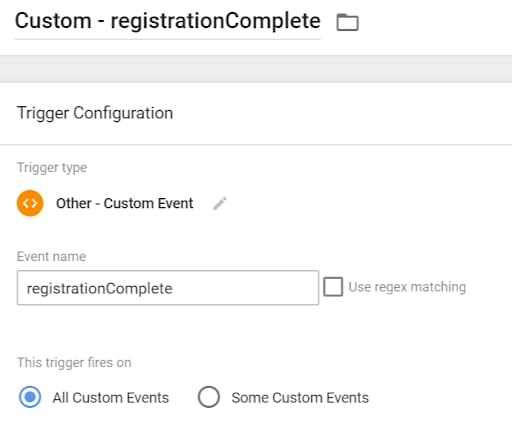
#3.4. Configure Custom Event Trigger
Data Layer events do not appear in the Google Tag Manager as triggers by default. Instead, you need to configure that yourself. To track successful registrations, we need to instruct GTM that registrationComplete events are essential to us, and we wish to use them as triggers.
As for such situations, Google Tag Manager uses a trigger type called Custom Event. Navigate to Triggers > Trigger Configuration and choose Custom Event as trigger type. Define the conditions for the trigger to fire:
If you also wish to use registrationCountry and plan as variables in your Google Tag Manager tags, read the guide on accessing data in the Data Layer and turn them into GTM variables.
#3.5. Configure Data Layer Variable
You also have the option to send more data along with the custom event. Data Layer variables come to the rescue here.
Let’s access the plan key from the Data Layer to continue our example. In GTM, go to Variables > New > Data Layer Variable.
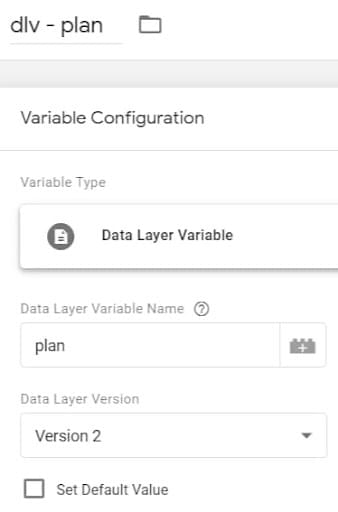
We entered “plan” because that’s the name of the key in the Data Layer (when a developer pushed the registrationComplete event).
#3.6. Create a GA4 Event Tag
Let’s create a GA4 event tag to fire every time we push a registrationComplete event to the Data Layer. In GTM, go to Tags > New > Google Analytics > Google Analytics: GA4 Event. Enter the following settings:
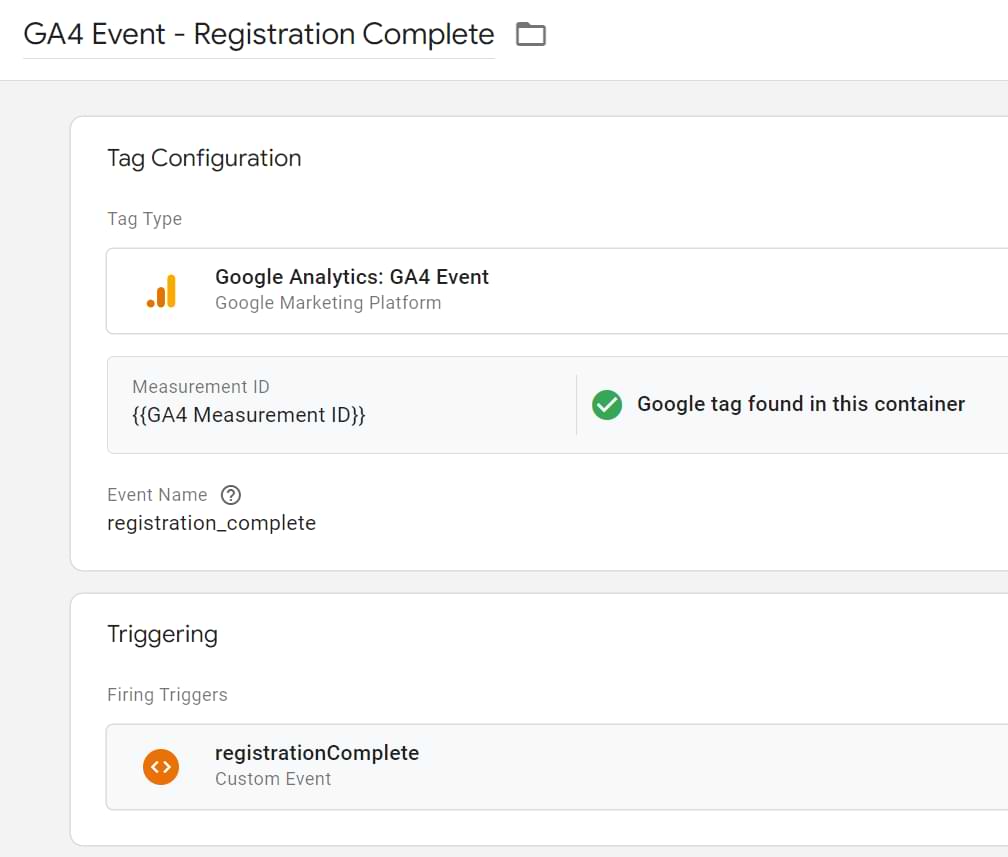
Once you save the tag, test it in the Preview & Debug Mode of Google Tag Manager. If it is successful, check if it has passed over to the DebugView dashboard in GA4.
Finally, publish your GTM container changes by clicking the “Submit” button in the top-right corner.
Google Tag Manager Event Tracking: Final Words
Phew! Look at the time. If you’ve read till the end of this blog post. Hopefully, this was a good introduction. To sum up:
- Google Tag Manager is a great tool for sending events to GA4 or any other web tracking tool. The built-in functionality can capture many user interactions (clicks, element appearances, YouTube video interactions). However, they will require additional configuration (variables, triggers, etc.)
- However, there are still many interactions that might need custom solutions. One of them is to find tutorials that use custom codes (which can track those interactions, e.g., when an image appears on the user’s screen)
- If none of the above solutions help, cooperate with a developer. Ask them to push the event and its data to the Data Layer. For example, you can deploy a Custom Event Trigger + Data Layer Variable and send the event to GA4. In this blog post, we sent the information of successful registration.
This guide does not cover all the possible scenarios. If interested, here’s how you can track forms, affiliate links, video players, etc.
13 COMMENTS
How can you find out where your events are tracking from? I inherited a site and Google Analytics account that shows event tracking. I can see the report in GA. There are external links and downloaded file events that are being tracked automatically. Does that mean these events were set up in Google Tag Manager? I don't have access to the GTM account that's being used on our site.
They might come from GTM, but not necessarily. There might also be some plugins installed on the site that send the data. But to eliminate the guesswork, you will need to get access to GTM.
How do I connect to Google Analytics Universal when using a Custom HTML Tag Type?
Don't do that. Use dedicated tag templates in GTM
What is the best practice for event tracking, when i want to have multiple information about that particular event.
For instance, I want to track clicks on articles (not ecommerce tracking). When user clicks on any article that listed on the page, they can review all information about this it, those such as category, subcategory, name, price etc. This is more information then that i can record in event action, event label etc?
Use custom dimensions. But in 2023, July, Universal Analytics (the one that you use) will stop working. So maybe it's time to start migrating to GA4? https://www.analyticsmania.com/post/how-to-track-events-with-google-analytics-4-and-google-tag-manager/
Hi! Google Analytics has "purchase" automatically created as an event and counted as a conversion. If I use GTM to send an event to GA4 called "purchase," will GA4 automatically know that these events go into the "purchase" event that was already created (automatically) by GA4? Or will this cause two different "purchase" events in GA4, meaning I will have to link them somehow?
GA will understand that this is a "purchase" event
Your content is great so kuddos!
is there a way to track revenue for custom events in GTM? for example, someone clicked a specific element then made a purchase; is there a way to attribute that purchase with that specific event?
No. You can send value, but it will be displayed as an "event value' metric
Can you distinguish between individual event values? When I filter for a specific event, the event value stays the total of all event values, and doesn't update to only the value of the specific event.
hi, thank you so much for your tutorials, so helpful !! I have a question : I managed to create a trigger, a tag, a custom variabl( based on your example). In debug mode, the trigger fires, and in debug mode in Google Analytics, I can see the events in the time line. Now, How can I track taht in GA reports ? It is for a quiz with radio buttons, in GTM in the debug "variable' tab, I can see the radio button id and value. Are these information reported somewhere in GA4 ?